

How to create your own home lab NTP server? While I’m not an expert on NTP (network time protocol), I decided to create my own NTP server for my home network. This was for multiple reasons:
- To learn about NTP servers and clients.
- Take the load of NTP off of my pfsense home router.
- Audit my home lab and learn where to change NTP on Windows, Ubuntu, pfsense, Cisco, ESXi and DHCP.
- Ensure the same time is provided to my home network regardless of outside internet connectivity.
For my home lab, I decided to use an NTP server on Ubuntu. This was because I can easily deploy a small Ubuntu server within my home lab. Full disclosure, I learned from these guides here and here.
Essentially, you just install NTP:
sudo apt install ntp
sudo nano /etc/ntp.conf
sudo systemctl restart ntp
sudo systemctl status ntp
You can check on the status of NTP with “ntptime” and the servers used for ntp with “ntpq -p”. You should disable the Ubuntu timedatectl setting for NTP if you are switching to the NTP package. This is what the process looked like:


Now that I had a functioning NTP server it’s ‘time’ to set my clients to use it.
Pfsense
First, I needed to disable the NTP server on pfsense: go to Services > NTP > Settings. Now uncheck the ‘Enable NTP Server’ then select save at the bottom.
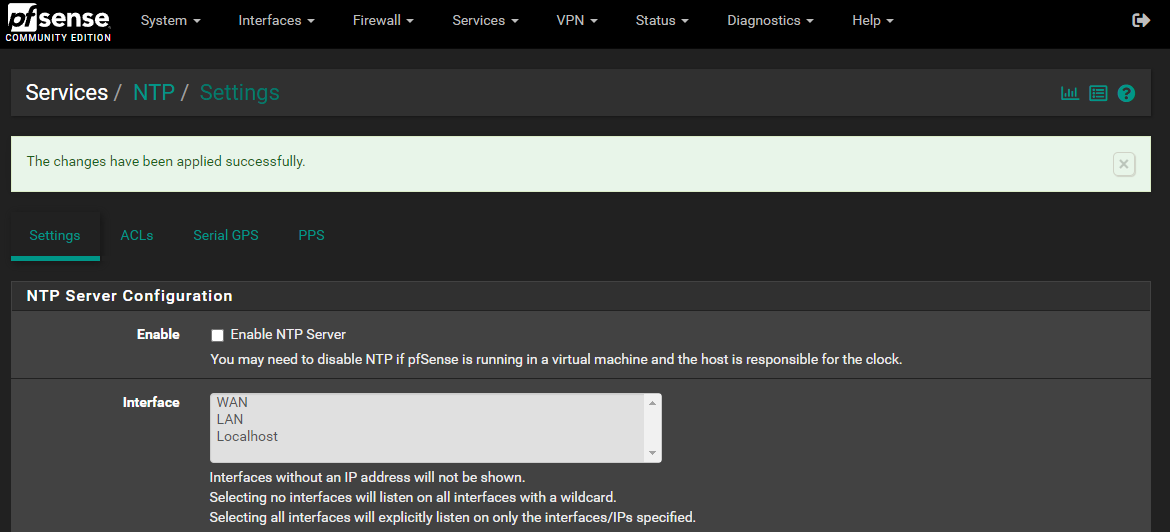
Next I set the NTP server that pfsense used to be the server I just created. Go to System > General Setup > scroll down to ‘Localization’ and put your NTP server in the “Timeservers” space.


I use pfsense for DHCP, so the last step was to ensure that DHCP sends out my new server for NTP. Go to Services > DHCP Server > Lan > scroll down to NTP ‘advanced’ and input the NTP server.


VMware ESXi
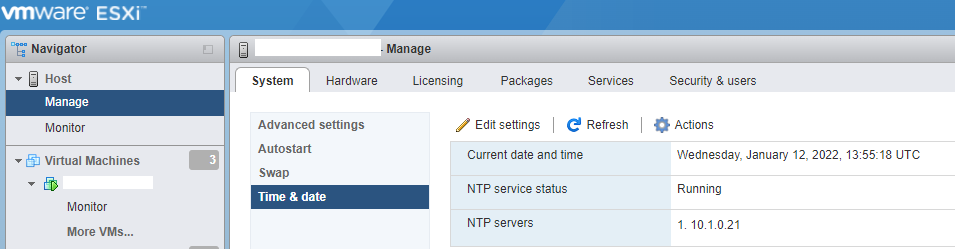
Further down the list of clients to use NTP is an ESXi server. Within ESXi html UI go to host > manage > system > time & date > edit settings for the new NTP server.
Windows 10
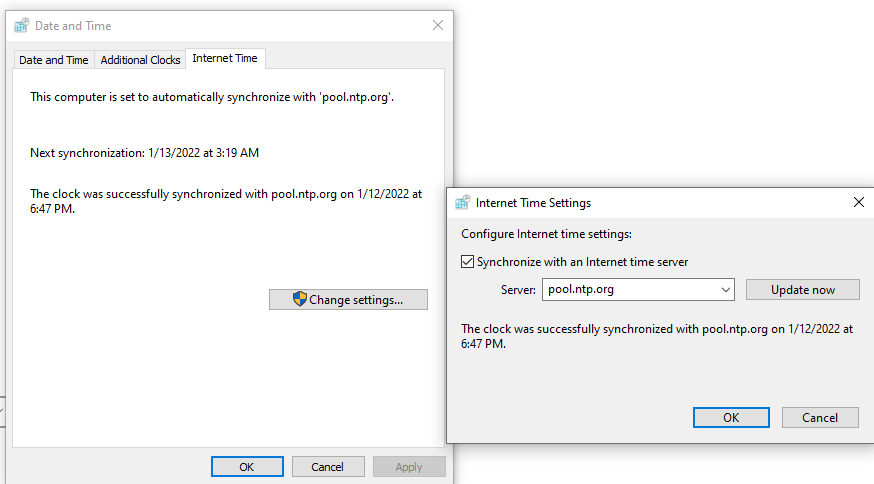
Initially, for a Windows 10 pc, you right click on time in the bottom right and select “Adjust date/time.” (There are probably other ways to get to this menu, this is just how I accomplished it.) Select “Add clocks for different time zones” on the top right. Finally go to the internet time tab > Change settings > enter in your NTP server and click ok a few ‘times’.
Ubuntu Client
For Ubuntu workstations or other servers you can either install NTP again and just reference the main NTP server or change timedatctl. Here are few useful commands and screenshots for reference:
timedatectl status
sudo nano /etc/systemd/timesyncd.conf
sudo systemctl restart systemd-timesyncd.service
timedatectl show-timesync --all

sudo nano /etc/ntp.conf
server x.x.x.x prefer iburst


Cisco Switch
Last up I set the NTP server on my Cisco switch. For my model I had to login via telnet. These were the commands which I learned with the help of this site.
enable
show clock
conf t
clock timezone EST -5
clock summer-time EDT recurring
ntp server x.x.x.x
exit
copy run start
show clock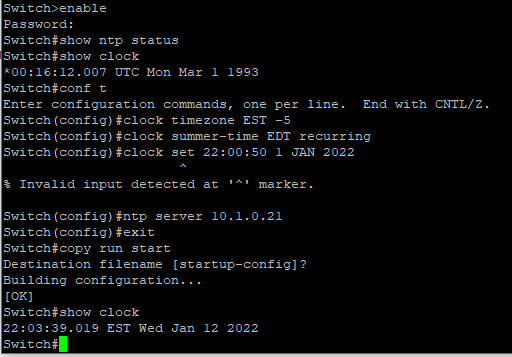
Summary
This was a fun project to do, however, how do you know that you are serving NTP requests? For that, I found some commands you can run to show packets received and sent. This does not do a full client list but, aside from running through this guide and logging IP addresses through a firewall, this was good enough. Plus, my clients all seemed to have the same time as I checked them all. I found these commands from this guide here.
ntpq -c iostats | grep 'received packets' | awk '{print $3}'
ntpq -c iostats | grep 'packets sent' | awk '{print $3}'
Additionally, check out my previous blog post here.
Enter your address to subscribe to this blog and receive notifications of new posts!
People get crypto to read and post blogs. Publish0x is like Medium but the author and the reader get tips. You can use my referral link below and check it out.
God bless you!
You must be logged in to post a comment.